Contents
- Decorating champagne glasses with rose petals
- Decor of wedding glasses with ribbons
- Decoration of wine glasses with rhinestones
- DIY wedding wine glass design ideas
- Video: DIY wine glasses for a wedding
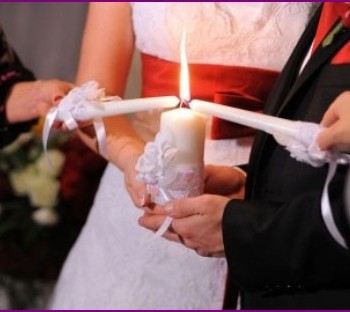
A wedding is a holiday that cannot do without special paraphernalia. It includes invitation cards, bonbonnieres, chests for money, pillows for rings and much more. An important detail of the celebration is glasses, from which the newlyweds will drink champagne after the registration of marriage. Future spouses can show imagination by designing wedding wine glasses with their own hands, and detailed master classes with photos will help them in this. The decor of the glasses will not only save a little money, but will also make the original dishes a real heirloom.

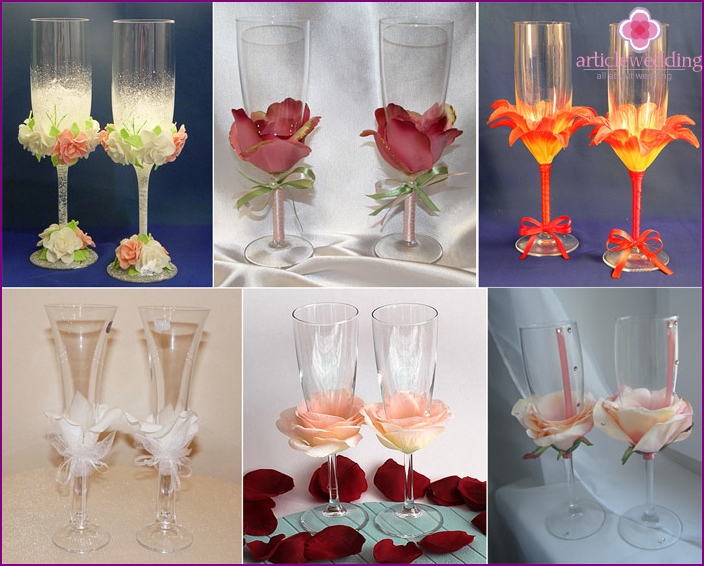
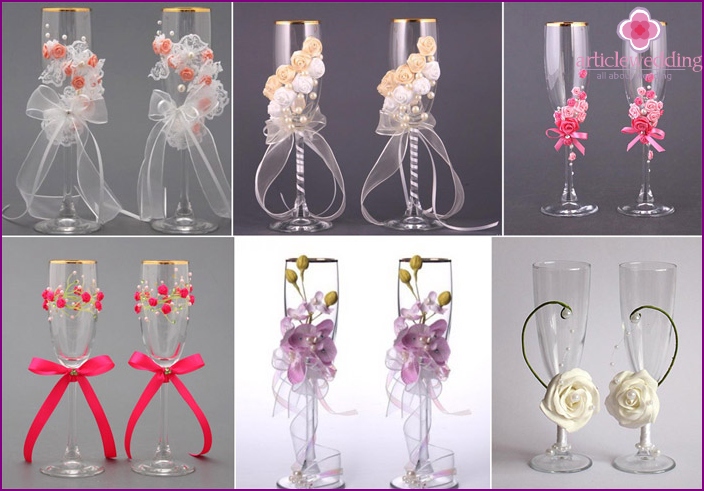
Decorating champagne glasses with rose petals
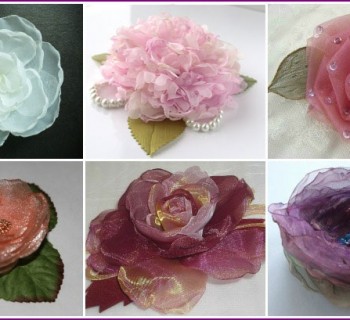
As a rule, wedding glasses are decorated in accordance with the style or theme of the celebration. For a beautiful romantic wedding, future spouses can make glasses decorated with rose petals. This plant symbolizes the love between the groom and the bride, and the shade of the selected flower will tell about the true feelings of the newlyweds. Choosing a red rose, the perpetrators of the wedding hint at the passionate nature of their relationship, white at the purity, innocence of marriage, pink petals speak of tenderness, respect, trust in each other.
Necessary materials
- Glasses (it is better to decorate three or four, if suddenly the main wine glasses break).
- Two high-quality artificial roses of the right color (with neat petals).
- Glue (instant for ceramics, silicone or superglue).
- Mother of Pearl Beads.
- Scissors.
- A4 paper.
- Thin brush.
- Pencil.
- Alcohol or acetone.
- Stained glass paints of suitable shades (one is light, the other is contrasting).
Stages
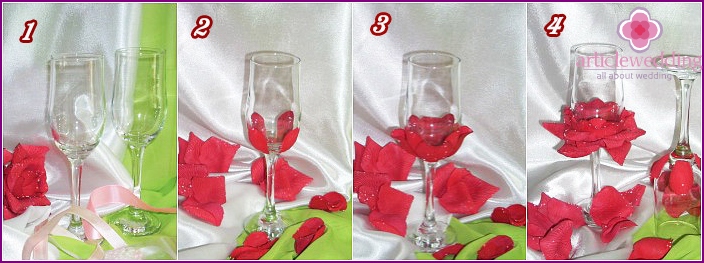
- Thoroughly wipe the surface of the wedding product with alcohol or an acetone solution - this will remove fat from the glass that interferes with fixing the decor to the glass. Rinse with running water to remove any remaining cleaning agents. Take a dry soft rag, rub the surface of the glass so that you can creak.
- Take an artificial rose flower, carefully disconnect the stem from the petals. Using scissors, separate the tiers one by one so as not to damage the surface of the plant. When all the petals are disconnected, round off the lower part with scissors so that there are no sloppy edges. Start gluing the smallest petals to the base of the wedding product, creating the core of the rose. Wait for the adhesive to dry..
- Take the larger petals, glue them a little lower than the previous parts of the artificial plant. Petals of the next tier should completely cover all arising gaps.
- Continue to decorate the wedding attribute, with each new layer attaching larger petals. When everything is ready, you will get a beautiful foundation for a future wedding product. Do the same with the second wine glass, carefully attaching the petals.

- To make it clear who owns these beautiful wedding accessories, you need to make these products personalized. To do this, you need to paint the surface with paints with the names of the newlyweds, and also, if desired, the date of the wedding. There is a little trick that will help to make the inscription beautiful and even: type your names in one of the office programs with the font you like, then print the text on paper or write it carefully yourself.
- Then slightly moisten the petal with water, put inside the wedding glass. Names should be in the place where the inscription will be made with paints. Make sure the paper fits snugly against the walls and does not slip..
- Take a brush, dip it in the paint (do not take much so that it does not flow). Circle the names carefully. In order to make it clear where the wedding attribute of the groom is and where the bride is, make inscriptions in different colors - red for the bride, silver for the groom. If the saturation of the colors does not suit, you need to apply a second coat.
- If you wish, you can use acrylic paints to further decorate the surface of the wedding product - with curls, hearts, stars, whatever your heart desires.
- The final touch of decoration for wedding glasses with petals is mother of pearl beads. Cut them in half, gently apply glue, and then randomly decorate them with glass - it will look great! Champagne glasses with petals are ready!

Photo
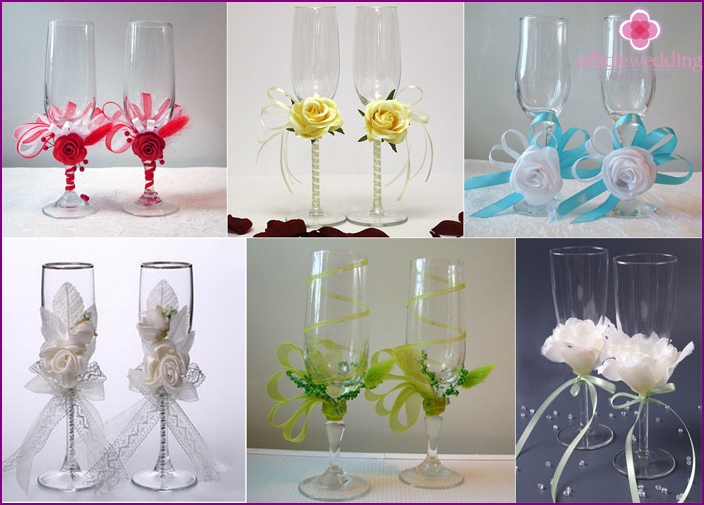
There are many options for decorating wedding glasses with petals - the color of plants, the type of flower used, and elements of additional decor vary. Both laconic glasses decorated exclusively with petals and an elegant ribbon on the leg look wonderful, and solemn attributes generously decorated with rhinestones, beads, lace, inscriptions or stones.
Decor of wedding glasses with ribbons
Wedding glasses decorated with ribbons look cute and gentle. This decorative element is able to give festivity to any wine glass - sometimes it’s enough to tie a ribbon on the upper part of the leg, so that ordinary dishes become a real wedding attribute. Below we will consider the option of self-designing a wedding attribute using polymer clay and elegant satin ribbons. Such wine glasses will be a wonderful decoration of a wedding celebration, everyone present will surely pay attention to their unique decor..
Necessary materials
- Wine glasses.
- One stick of white polymer clay (color can be chosen as desired).
- White glass contour.
- Lilac glass contour.
- Dry pastel (white, lilac).
- Large beads.
- Small beads.
- Superglue gel.
- Thin satin ribbons of snow-white and lilac shades.
- Alcohol or acetone.
- Stationery knife.
- Nail scissors.
- Paper.
- Ball Head Pin.
- Nail file.
- Brush.
Stages
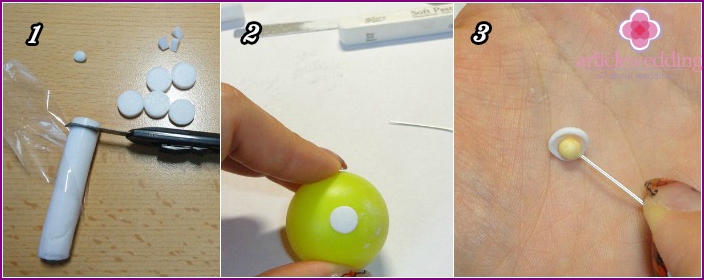
- Wipe the surface of the wedding degreaser with alcohol. Rinse with water, then dry, wipe the future wedding glass with a soft cloth until a squeak. Cut pieces of equal width from a stick of polymer clay. Cut the resulting circles into several equal parts again - these are future flowers.
- To make the basis for the flower, take one cut piece of polymer clay, roll it into a ball, then press it to the surface of the paper. The required thickness of the base is about 1.5 mm, not less. If the clay is too fresh and sticks to your hands, rub a little pastel with a nail file, then roll the parts in «flour» - they will not stick to fingers or paper.
- Next, roll up five balls (for five petals), press them to the paper, then put on your palm. To create a petal, take a pin with a round head, in a circular motion, roll a piece of polymer clay from the center to the edges. The thickness of the finished part should be about 0.5 mm.
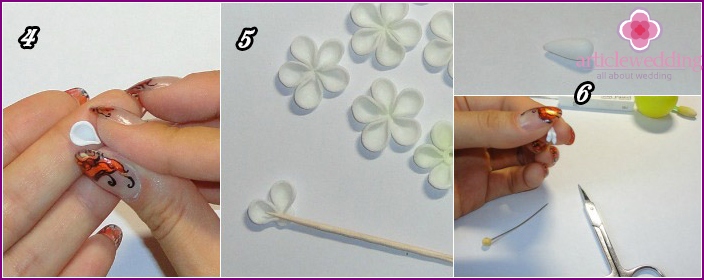
- To form the final look of the petal for the wedding glass, gently pinch from one edge, making an angle.
- Gently attach the petals to the base. Do it better with a toothpick so as not to damage the delicate flower.
- Make some half-opened buds. To do this, take three petals, gently blind them together with a toothpick. To make the wedding glass richly decorated, make small buds like lilac flowers that are just starting to open. Make a ball first, then roll it into a drop. When ready, with nail scissors cut the top of the drop in half, and then the halves themselves.
- Put all the ready-made floral decorations in the oven to bake for a quarter of an hour at a temperature of 110 degrees. Let cool in an open oven. Next, with the help of superglue, attach the resulting jewelry to the wedding product - it is important to make the correct, beautiful composition.
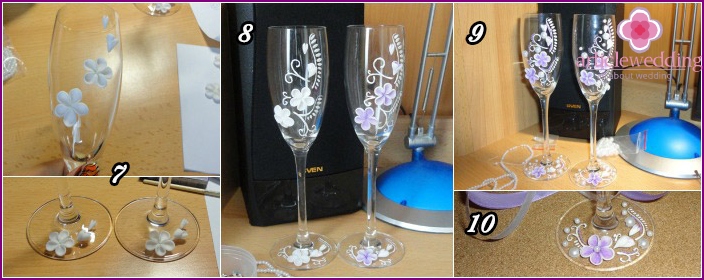
- Take a nail file, rub pastels of both colors, mix. Brush the resulting mixture into the petals, and then draw the veins with a purple outline.
- With a white outline, draw patterns that you like. Complete the resulting drawings with lilac details..
- With a clerical knife, cut large beads, fix them on the surface of the wedding glass. Small decor elements do not need to be cut - decorate with them the places that seem empty.
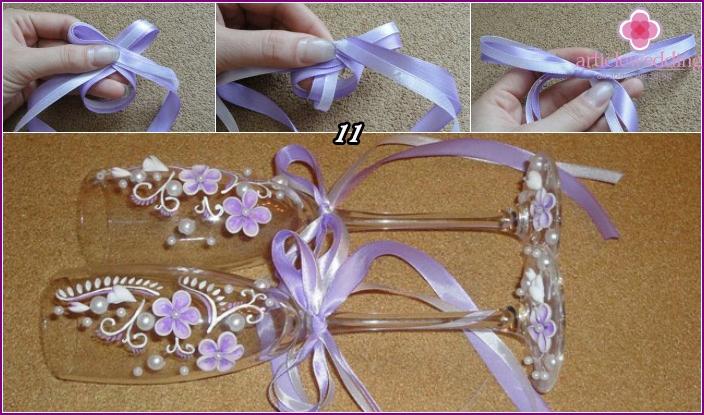
- Take two ribbons - white with purple. Fold them in loops as shown in the first photo. Slide one into the other, gently tighten the knot so that the ribbons do not twist. Singe the edges (so the satin threads will not separate and not fray), then glue the resulting bow to the foot of the wedding attribute. Beautiful wine glass is ready!
Photo
Looking through the various ideas for creating wedding glasses with ribbons, it will be easier for newlyweds to come up with and implement their own version. Ribbons on the thin leg of a champagne glass look elegant, emphasize its elegance, and decorations with ribbons and lace on the bowl look festive. Satin, silk, tulle fabrics of different widths can be used..
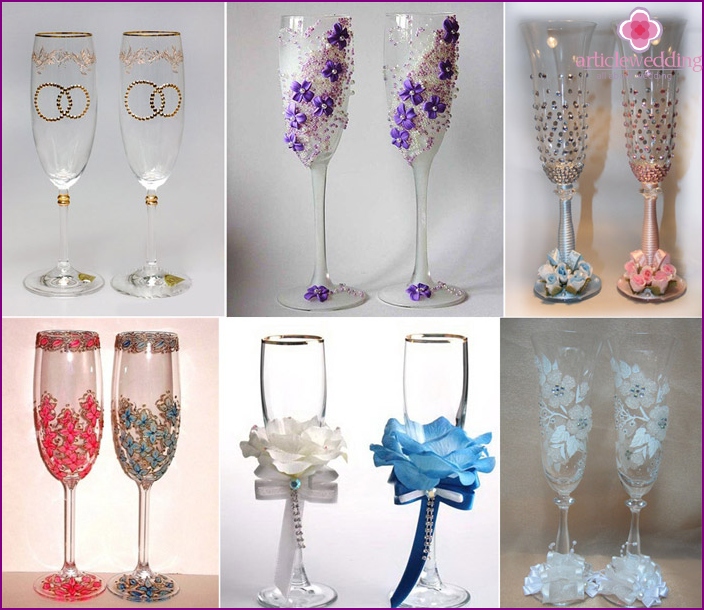
Decoration of wine glasses with rhinestones
If the heroes of the occasion are not lovers of lace ribbons, polymer clay or rose petals, a wonderful option for decorating a wedding glass is decor with rhinestones. Shining stones will look gorgeous, this design is perfect for a rich formal wedding. Rhinestones can be inexpensive or from Swarovski, but in any case they will help to create a truly original decoration of a wedding attribute.
Necessary materials
- Wine glasses.
- Rhinestones with glue base that will please you by color.
- Big bead.
- 50 cm color satin ribbon.
- Scissors.
- Glue gun.
- Matches.
- Alcohol or acetone.
Stages
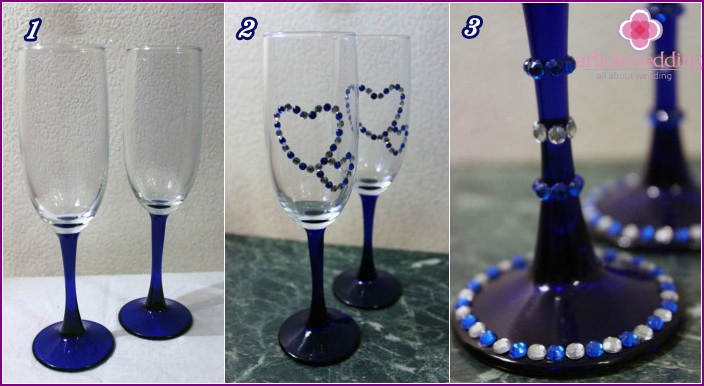
- Wipe the wedding products with alcohol, rinse them well, then wipe them with a dry cloth until they are thoroughly cleaned. It must be remembered that after the glasses appear decor, they can not be washed - only gently wipe with a cloth, napkins or rinse from the inside.
- As for the decoration of the wedding attribute bowl, it all depends on the decorator’s imagination - it can be initials or hearts, as shown in the photographs. Decorate with some symbolic pattern the wine glass on one side.
- To make the fougere festive, stick rhinestones along the edge of the leg. Then decorate the leg itself - in three places, as shown in the figure..
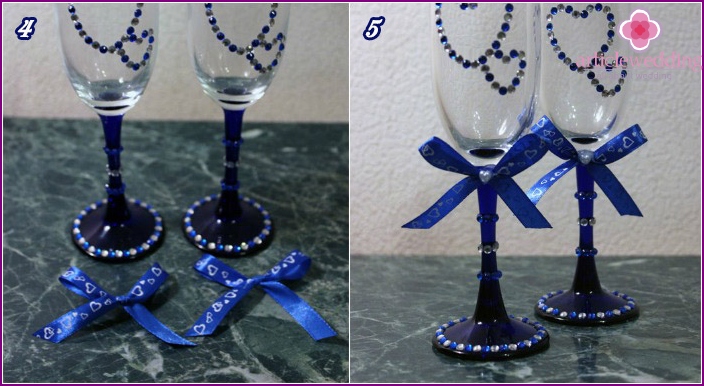
- Cut the ribbon into two equal parts, make neat bows. To make the ends look neat, they need to be trimmed - preferably obliquely. This type of trimming can provoke that the threads of the tape will open, so you need to burn them a little with a match.
- Take the glue gun, apply a little glue to the ribbon, then carefully attach it to the base of the bowl of the wedding item. Make sure that the glue is not visible behind the bow. The tape should be on the front side, where the pattern is laid out with rhinestones. Cut the bead in half, attach one half to the center of the bow - this will be the final touch to decorate the wedding attribute. Beautiful wine glasses are ready!
Photo
A popular option for decorating a wedding glass with rhinestones is the initials of the heroes of the occasion, lined with beautiful shining stones. This design looks concise, but gives a truly festive look to such wedding attributes. Wedding glasses look great, where rhinestones completely cover the glass leg - such a decor will definitely not go unnoticed. Even newlyweds may like the decoration option, implying an arbitrary arrangement of shiny pebbles - it looks elegant and unusual.
DIY wedding wine glass design ideas
When choosing a decor for wedding glasses, future spouses are usually guided by their personal preferences and themes of the upcoming event. If the heroes of the occasion arrange a wedding in a certain style, the glasses should definitely reflect it. For example, in addition to classical decor elements, more interesting options can be used - twigs, dry leaves, shells, chains, feathers. Unusual may be the painting of wine glasses, which will emphasize the originality of a young couple.
Rhinestones or Beads
To create a beautiful decoration of a wedding attribute with rhinestones or beads, the heroes of the occasion will have to do painstaking work - imperfections in the design of a wedding glass with small details will immediately be noticeable. The pattern created using these decorative elements can be minimalistic or vice versa - rich, artsy, newlyweds need to proceed from their own tastes.
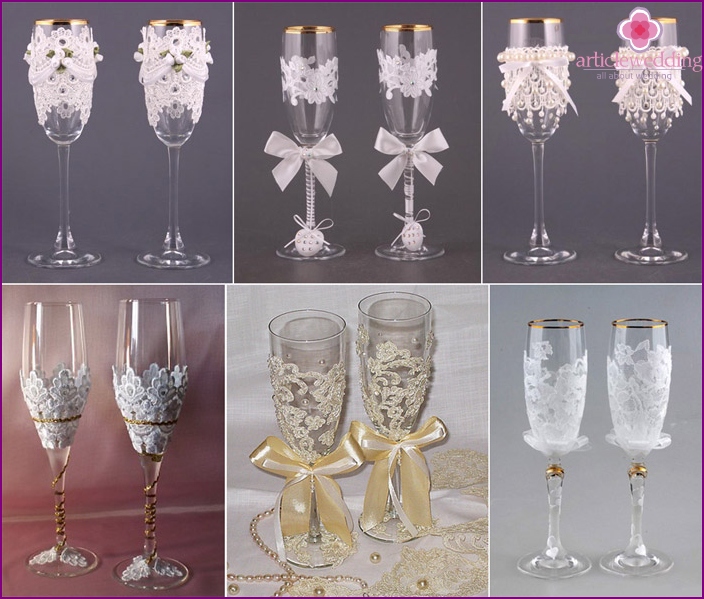
Openwork lace
Lace is a delicate, airy material that seems to be created for a wedding. If the hero of the occasion is getting married in a lace dress, then wine glasses decorated with this material will favorably emphasize her romantic, touching outfit. The leg of the glass, the base of the bowl or its middle can be decorated with graceful fabric - each option looks interesting in its own way.
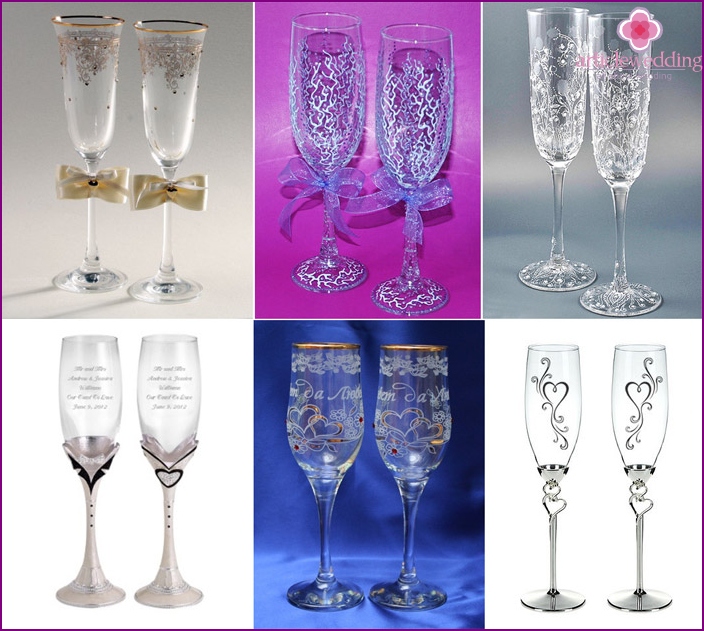
Decorative painting
Glass painting is one of the most popular ways to decorate a wedding attribute, because the drawings allow you to realize any wishes of the newlyweds, create incredible images. Based on their imagination, future spouses can come up with a unique design: draw graceful birds, frosty patterns or cute butterflies. A wedding glass can only decorate a painting or additional decor - ribbons, lace, rhinestones, beads, engraving.
Video: DIY wine glasses for a wedding
Painting wedding glasses yourself can be difficult for those who have no experience in the artistic field. Therefore, it is necessary to stock up on stencils in advance - they can be drawn by turning on fantasy, or find suitable drawings on the Internet. Beautiful painting of glasses will become a bright decoration of the celebration, will allow the newlyweds to realize all their wishes, and the presented video will help to understand the intricacies of applying drawings with paints on glass. Needlewoman Anna Koshkina reveals the secrets of beautiful painting of wine glasses using a DIY stencil: